
For everyone who hasn’t decided on their Easter decoration yet, don’t worry I’ve got something practical for you, which you can use not only during Easter time. This basket was my March contribution to Craftaholics Anonymous so if you saw that post you’ll recognise it. I’m sharing the pattern, here again, this time with the “translation” to UK terms just in case you prefer to use them over US crochet terms (and for everyone else to miss out on the post the last time) :)
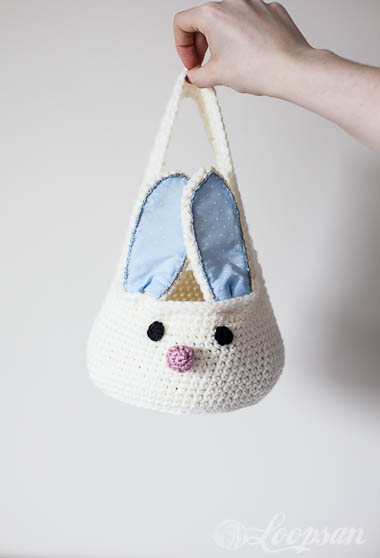
Crochet Bunny Storage Basket – Free Pattern
You’ll need:
- 2 balls of DK yarn in cream (I used Stylecraft Special DK in cream for mine)
- a little bit of DK yarn in pink and black
- 6.5 mm hook (again this depends on your tension and the yarn you’re using. The general rule is if it’s too floppy go down a hook size, if it’s too tight go up a hook size)
- a little bit of contrast fabric
- sewing thread in contrast colour
- tapestry needle

Abbreviations
ch= chain
sc= single crochet (US term); double crochet (dc, UK term)
st= stitch(es)
In my patterns, UK terms are always given in brackets.
Let’s get started:
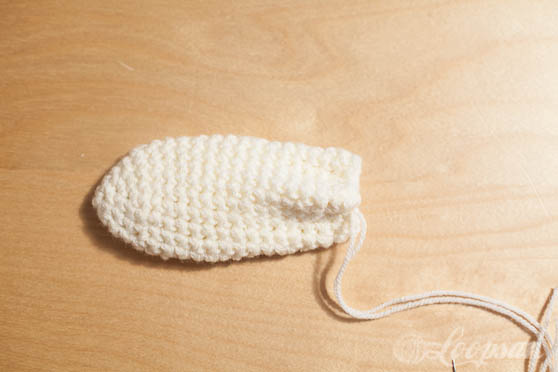
Main basket:
with cream
Round 1: 6 sc (dc) in magic ring. (6 st)
Round 2: 2 sc (dc) in each st around. (12 st)
Round 3: *2 sc (dc), sc (dc) in next st*, 6 times. (18 st)
Round 4: *2 sc (dc), sc (dc) in next 2 st*, 6 times. (24 st)
Round 5: *2 sc (dc), sc (dc) in next 3 st*, 6 times. (30 st)
Round 6: *2 sc (dc), sc (dc) in next 4 st*, 6 times. (36 st)
Round 7: *2 sc (dc), sc (dc) in next 5 st*, 6 times. (42 st)
Round 8: *2 sc (dc), sc (dc) in next 6 st*, 6 times. (48 st)
Round 9: *2 sc (dc), sc (dc) in next 7 st*, 6 times. (54 st)
Round 10: *2 sc (dc), sc (dc) in next 8 st*, 6 times. (60 st)
Round 11: *2 sc (dc), sc (dc) in next 9 st*, 6 times. (66 st)
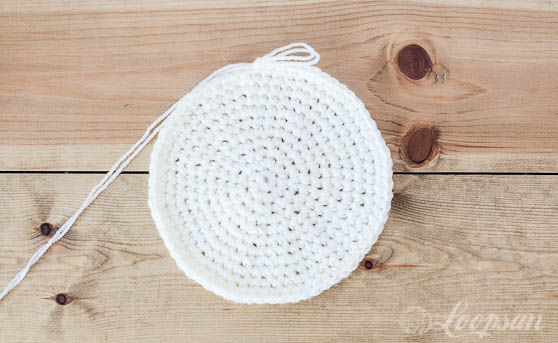
In back loops only
Round 12: sc (dc) in each st around (66 st)
Round 13-27: sc (dc) in each st around (66 st)

Now we’re going onto the handle (as you can see the basket can stand as well so you don’t need to attach them if you don’t want to, but I wanted to be able to hang my basket onto something):
Row 1: sc (dc) in the next 8 st, ch 1 turn (8 st)
Row 2-50: sc (dc) in each st, ch 1 turn
Fasten off and sew to the other side of the basket. (if you want your handle to be bigger or shorter just make more or less rows here)
Ears (make 2):
Round 1: 4 sc (dc) in magic ring. (4 st)
Round 2: 2 sc (dc) in each st around. (8 st)
Round 3: *2 sc (dc), sc (dc) in next 3 st*, 2 times (10 st)
Round 4: sc (dc) in first st , 2 sc (dc), sc (dc) in next 4 st, 2 sc (dc), sc (dc) in next 3 st (12 st)
Round 5: *2 sc (dc), sc (dc) in next st*, 6 times. (18 st)
Round 6-19: sc (dc) in each st around (18 st)
Fasten off but don’t weave it your ends, as you’ll use the end to sew the ears onto the main basket body.
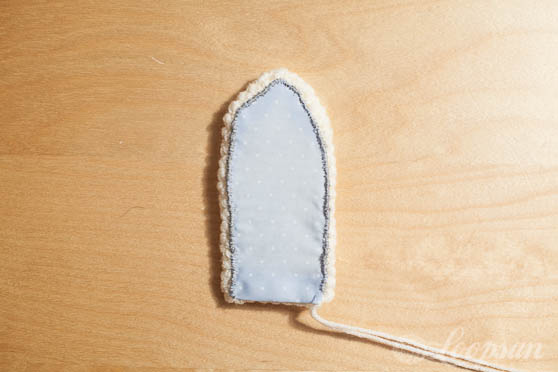
Now grab your fabric and cut pieces which are just slightly bigger than your ears.
Then sew them onto your ears. I went for the “rustic” look with a contrast thread but that’s really up to you.
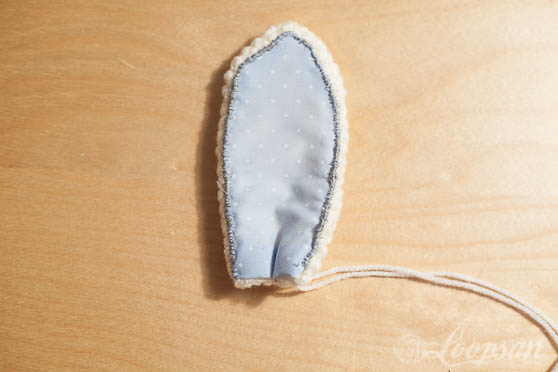
Sew a fold into your ear.
This is how it should look like from the back, then go and sew it onto your basket.
Eyes (make 2):
with black
Round 1: 6 sc (dc) in magic ring. (6 st)
fasten off, sew onto your head
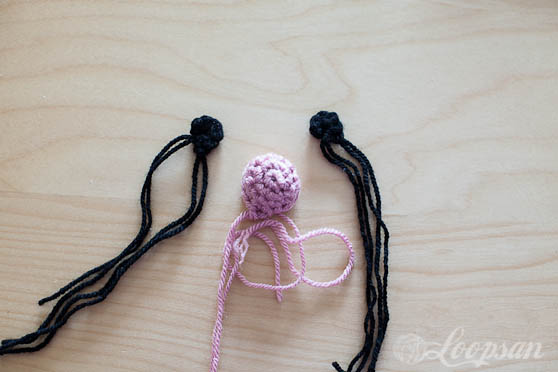
Nose:
with pink
Round 1: 6 sc (dc) in magic ring. (6 st)
Round 2: 2 sc (dc) in each st around (12 st)
Round 3-4: sc (dc) in each st (12 st)
fasten off, sew onto your head.
And that’s it. Now you can hang it where ever you fancy. Mine will be my new storage for a little bit of my yarn stash. Or maybe you’ve got a little one who would like to go Easter egg hunting with this cute basket :)
HAPPY EASTER :)
I hope I’ve inspired you to make your own bunny storage basket and would love to see how it turned out so please feel free to post a picture to my Facebook wall or link the project to your Ravelry account. And don’t forget to follow me on bloglovin to stay updated on what’s happening here.
Stay updated and receive exclusive discount codes in your email inbox

Happy Crocheting!

Disclaimer: This pattern is not for resale so please do not sell it to other people. If you do use it and enjoy it, I’d be grateful for a link back to my blog and the pattern, but please don’t copy and paste it to your website or copy my pictures. You’re allowed to sell finished items created with the pattern, but please do give me credit as the designer (link back to the blog when selling online). Thank you!


6 Comments
<3 this basket – it's simply adorable :) Sharing on fb later on today!
This is really cute. I love how you put fabric in the ears on this and the rattle.
Soooo cute, this bunny! If I just use it as a basket, i.e. without the strap – do the ears still stand upright?
Thank you :) If you would only make it as a basket I would put some pipecleaners in the ears to stabilize them, just to make sure that they stay up :)
Pingback: The 15 Biggest Egg Hunt Ideas of this Easter - Hobbycraft Blog
Pingback: 6 DIY Easter treat bags - Mollie Makes